Master Shopify Functions Discount Logic
A developer's guide to the Shopify functions discount API. Learn to build, deploy, and configure powerful custom promotions that drive sales and loyalty.
If you've ever felt constrained by Shopify's built-in discount system, you're definitely not alone. The standard options are fine for a straightforward 10% off or a simple free shipping offer, but they hit a wall when you want to get more creative with your promotions.
In today's competitive market, generic deals just don't capture attention anymore. You need unique, personalized offers that make customers feel special and encourage them to buy more.
Why Standard Discounts Don't Always Make the Cut
This is where the cracks in the standard system start to show. Let's say you want to run a "Buy 2 T-shirts, Get a Hoodie for 50% Off" sale. Or what about offering an exclusive discount to wholesale customers with a 'VIP' tag, but only when their cart contains over $500 worth of specific products?
With Shopify's out-of-the-box tools, these kinds of complex, multi-layered promotions are either incredibly difficult or flat-out impossible to build.
Unleashing Your Promotions with Custom Logic
This is exactly the problem Shopify Functions were designed to solve. Think of them as small, purpose-built pieces of code that plug directly into Shopify’s backend. They give you a direct line to the checkout process, letting you dictate precisely how a discount should apply based on any condition you can code.
This ability to inject custom logic is a game-changer for running sophisticated campaigns. The power of advanced discounting becomes especially clear during peak shopping seasons. During a recent Black Friday Cyber Monday, for example, Shopify stores collectively pulled in an incredible $11.5 billion in sales, much of it driven by creative promotions. The platform supported a peak sales volume of $4.6 million per minute, proving just how critical a high-performance discount engine is for success.
This visual from Shopify's own documentation gives you a great idea of how your custom code fits into their system.

As you can see, your function executes within Shopify's secure, high-speed environment. It takes in cart data, applies your custom logic, and then passes the discount instructions back—all without adding any noticeable delay to the checkout experience.
To put the difference into perspective, here's a quick comparison of what you get with standard discounts versus what's possible with Shopify Functions.
Standard Discounts vs Shopify Functions
| Feature | Standard Shopify Discounts | Shopify Functions Discounts |
|---|---|---|
| Discount Logic | Limited to pre-set conditions (%, fixed amount, BOGO). | Fully customizable logic based on any cart or customer data. |
| Performance | Fast and reliable for simple use cases. | Extremely fast, as code runs on Shopify's native infrastructure. |
| Complexity | Struggles with multi-condition or tiered offers. | Easily handles complex scenarios like tiered pricing and bundles. |
| Personalization | Basic targeting (e.g., specific customers or products). | Highly personalized offers based on customer tags, order history, etc. |
| Stackability | Limited and often confusing combination rules. | You can define your own precise combination and stacking logic. |
| Development | No coding required; configured in the Shopify admin. | Requires development knowledge (Rust, JS, or TypeScript). |
Ultimately, Functions give you the keys to the kingdom, allowing you to build the exact promotional engine your business needs without being held back by platform limitations.
Real-World Scenarios Where Functions Shine
Let's ground this in some practical examples where a Shopify Functions discount is the only way to go:
- Tiered Pricing: Offer escalating discounts as customers buy more. Think 10% off for 5 items, 15% for 10, and 20% off for 15 or more.
- Complex Bundles: Standard BOGO is one thing, but Functions let you get far more creative. Many stores now implement custom product bundling discounts on Shopify to create unique kits and offers.
- Customer-Specific Deals: Reward your best customers with a special discount based on their tag, past spending, or even their geographic location.
- "Cheapest Item Free": A classic promotion that’s surprisingly hard to pull off with standard tools. With Functions, you can easily run a "Buy 3, Get the Cheapest Item Free" deal across an entire collection.
The Bottom Line: Shopify Functions aren't just a niche tool for developers; they're a powerful strategic asset for marketers. They elevate your promotional capabilities from fixed and generic to dynamic and highly personalized, which can have a direct and measurable impact on your conversion rates and customer loyalty.
Getting Your Local Shopify Dev Environment Ready
Before you can start building slick new Shopify Functions discounts, you need to get your local development environment sorted. Think of this as setting up your workshop. A solid setup from the start saves a ton of headaches later and gives you a reliable space to build, test, and tweak your code before it goes anywhere near a live store.
Thankfully, Shopify has done a lot of the heavy lifting for us. The main tool you'll be leaning on is the Shopify CLI. This command-line tool is your direct link between your computer, your Shopify Partner account, and your development stores. It handles everything from spinning up starter projects to pushing your finished function live.
The Foundational Tools
Before we get into the Shopify-specific stuff, let's make sure you have the basics installed. The entire Shopify Functions world, especially for JavaScript and TypeScript, is built on top of Node.js.
You absolutely need these four things before you go any further:
- Node.js: Make sure you have a recent version installed. All of Shopify's tooling depends on it for running the CLI and managing your project's dependencies.
- npm: The Node Package Manager. It comes with your Node.js installation and is how you'll install the Shopify CLI and any other packages your function might need.
- A Shopify Partner Account: This is non-negotiable. You can't create development stores or custom apps without one. It’s free to sign up and is your entry pass to building for the Shopify platform.
- A Development Store: This is your private sandbox. It's a free, full-featured Shopify store you create from your Partner Dashboard where you can test your functions without worrying about breaking a real business.
Once you've checked those boxes, you're ready for the main event.
Installing and Connecting the Shopify CLI
The Shopify CLI is the bridge between the code on your machine and the Shopify platform itself. To get it, you'll just run a single command in your terminal.
After it's installed, the next step is crucial: authentication. Running shopify login will pop open a browser window and prompt you to log into your Shopify Partner account. This securely tethers your local CLI to your account, giving it the permissions it needs to work with your stores.
My Pro Tip: If you're like me and juggle multiple clients or Partner organizations, the Shopify CLI has you covered. You can easily switch between accounts without the pain of logging in and out all the time. For freelancers and agencies, this feature is a lifesaver.
Once you're logged in, point the CLI to the right sandbox by running shopify store select. This tells it which development store you're working on, making sure that when you eventually deploy your Shopify Functions discount, it lands in the right place.
Start with a Template, Not a Blank Slate
Look, you could start a new function from scratch, but for your first one, I really wouldn't. Shopify has an official GitHub repository filled with excellent boilerplate examples for every type of function, including plenty of discount use cases.
Cloning this repo is the single best head start you can get. It drops you into a working, pre-configured project with example code you can start playing with right away. This way, you can dive straight into figuring out the discount logic instead of getting stuck wrestling with config files. Seriously, do yourself a favor and clone it—you’ll go from zero to a code-ready environment in minutes.
Let's Build Your First Custom Discount Function
Alright, let's roll up our sleeves and move from theory to practice. We're going to build one of the most common—and most powerful—promotions that standard Shopify just can't handle out of the box: a "Buy Product X, Get Product Y at a Discount" offer. This is where you'll really see the magic of a Shopify Functions discount.
Our journey starts with the Shopify CLI, which we'll use to spin up the basic file structure. From there, we'll dive into the JavaScript logic to create a function that’s not only effective but also reusable for your marketing team.
Firing Up the Function with Shopify CLI
The Shopify CLI is your best friend for scaffolding new functions. Pop open your terminal in your app's root directory and run the command to generate a new extension. It'll ask you a couple of questions. You'll want to choose "Product Discount" as the function type and, for this walkthrough, we'll stick with JavaScript. It's accessible and gets the job done perfectly.
After the command runs its course, the CLI will have created a brand-new directory for your function. This folder is packed with all the boilerplate code you need to hit the ground running, including a few key files we need to get familiar with.
This flow chart gives you a bird's-eye view of how everything connects, from the initial setup to a live discount on your storefront.
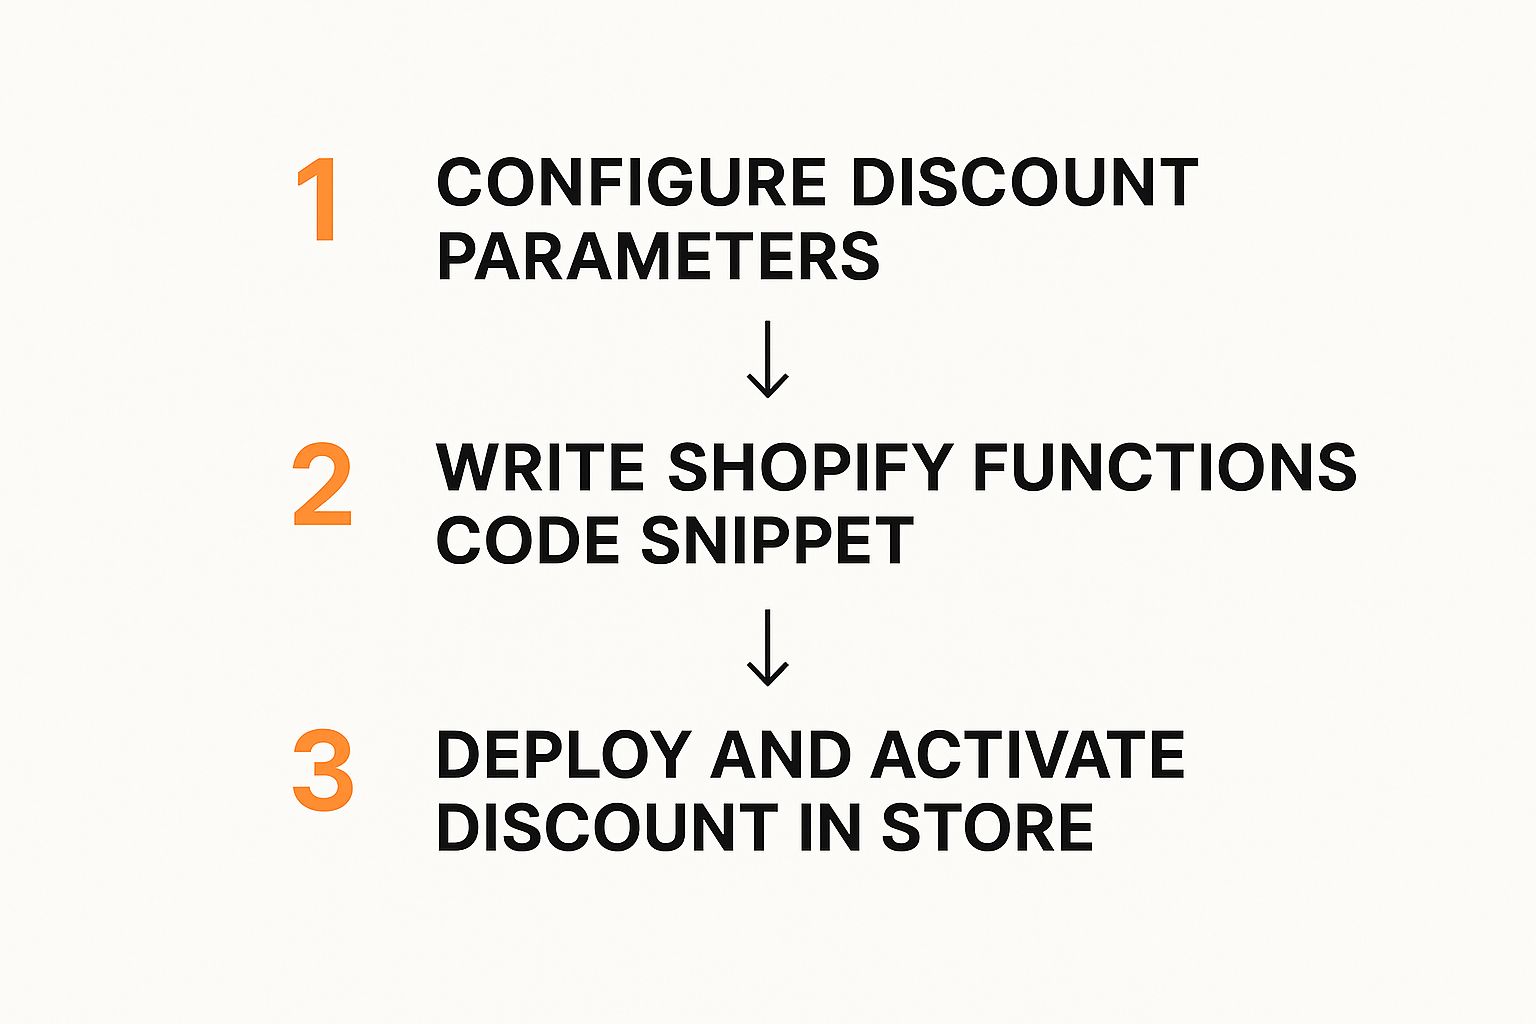
As you can see, it’s a neat process. The developer’s code and the merchant’s admin settings come together to create a powerful, customized promotion that feels seamless to the customer.
Getting to Know the Project Structure
Once you open the new function directory, you'll find a few files waiting for you. Understanding what each one does is crucial for figuring out how your code gets data from Shopify and tells it what to do in return.
shopify.function.extension.toml: Think of this as your function's configuration file. It tells Shopify your function's name and what it does. Most importantly, this is where you define any settings a merchant can tweak directly from the Shopify Admin.input.graphql: This file is where you tell Shopify what data you need. You'll write a GraphQL query here to pull specific details about the cart, the customer, or the products involved in the discount.src/run.js: This is the main event—the heart of your discount. This file contains all the logic. It takes the data you asked for ininput.graphqland has to return a very specific JSON object telling Shopify exactly which discounts to apply.
This separation of concerns is brilliant. By keeping the data query (input.graphql) separate from the logic (run.js), Shopify ensures your function is lightweight and fast, only ever receiving the data it absolutely needs. If you want to go deeper into the technical architecture, our detailed guide on the Shopify Functions API is a great place to start.
My Two Cents: A well-built Shopify Function is clean and focused. Your actual code should only worry about the discount logic. Let
input.graphqlhandle the data fetching and the.tomlfile manage the merchant-facing settings. Keep it modular.
Writing the Discount Logic
Time to get our hands dirty in src/run.js. The job here is pretty straightforward: take the input, see if the cart qualifies for our promotion, and then build the correct output for Shopify. For our "Buy X, Get Y" deal, the logic boils down to a few simple goals.
First, we need to check if both the "trigger" product (Product X) and the "target" product (Product Y) are actually in the cart. The input object passed into our function contains all the cart lines, so we can just loop through them.
Second, we check the quantities. The customer needs at least one of Product X in their cart to get the discount on Product Y.
Finally, if both of those conditions are true, we build the discount object. This object will specify the discount (e.g., a percentage off) and pinpoint the exact line item for Product Y. If the conditions aren't met, we just return an empty array. No harm, no foul.
How to Parse the Input and Structure the Output
The input your function gets is a JSON object that perfectly matches the structure of your input.graphql query. Your code just needs to navigate it. For example, input.cart.lines will be an array of objects, with each one representing an item in the customer's cart.
Here’s a simplified breakdown of what your code needs to do:
- Find Product X: Loop through
input.cart.linesto find a line item whose product ID matches your trigger product. - Find Product Y: Do the exact same thing for your target product.
- Apply Your Logic: If you found both, it's time to create the discount object.
- Return the Output: Assemble the final JSON payload exactly the way Shopify's API expects it.
Getting the output format right is critical. If it's even slightly off, the function will fail silently, and the customer won't see a discount. The most important part of the response is a discounts array.
// A simplified example of what the final output object looks like
{
  "discountApplicationStrategy": "FIRST",
  "discounts": [
    {
      "value": {
        "percentage": {
          "value": 50 // This means a 50% discount
        }
      },
      "targets": [
        {
          "productVariant": {
            "id": "gid://shopify/ProductVariant/123456789" // The ID for Product Y's variant
          }
        }
      ],
      "message": "You got 50% off!"
    }
  ]
}
This JSON snippet tells Shopify everything it needs to know: apply the first discount it finds, make it a 50% price reduction, apply it only to a specific product variant, and show the customer a nice little message.
Getting Your New Discount Live
Alright, you've built your custom logic and tested it locally. Now for the exciting part: pushing it out into the wild. This is where your code leaves your development machine and gets deployed to Shopify's global infrastructure, ready to start shaping customer carts and boosting sales. The process is a two-parter: first, you'll push the function up to the platform, and then you'll configure it right from the familiar Shopify Admin.
This handoff really shows off the power of the Shopify Functions discount model. Developers get to build the smart, reusable logic, and then marketing teams can take over, launching all sorts of campaigns without ever needing to see a single line of code.
Pushing Your Function to Shopify
The Shopify CLI is your best friend here. Getting your function from your local environment into your app on the Shopify platform is as simple as running one command in your terminal: shopify app deploy.
When you run this, a few critical things happen behind the scenes:
- It Compiles: Your JavaScript or Rust code gets compiled into a super-optimized WebAssembly (Wasm) binary. This Wasm file is the secret sauce behind the incredible performance of Shopify Functions.
- It Validates: The CLI checks your
.tomlconfiguration andinput.graphqlquery to make sure everything lines up with Shopify's requirements. No surprises later. - It Deploys: Finally, it uploads that compiled Wasm module and links it as an extension to your custom app inside your Shopify Partner Dashboard.
I've seen this trip people up before: make sure you've linked the CLI to the correct app and development store before you deploy. A quick check of your CLI's context can save you the headache of pushing your new discount into the wrong environment.
Once the CLI gives you the all-clear, your function is officially live on Shopify's servers. But it's not actually doing anything yet. Think of it like a new tool you've just put in your toolbox—it’s there, but you haven't picked it up to use it. Next, we need to tell Shopify how and when to use it.
Configuring the Discount in the Admin
Now you get to see your work from the merchant's perspective. Hop into the Shopify Admin for your development store and head over to the "Discounts" area. When you click to create a new discount, you'll find a new option under "Product discounts"—and it's the one powered by your custom app.
Clicking it takes you to a configuration screen. The fields you see here are a direct reflection of what you defined back in your shopify.function.extension.toml file. This is where the marketing team can work their magic. For our "Buy X, Get Y" example, they'd see fields that let them:
- Select Product X: A product picker for the item that triggers the deal.
- Select Product Y: Another product picker for the item that gets the discount.
- Set Discount Percentage: A simple number field to define the discount amount.
This beautiful interface creates a clean separation between the complex code and the campaign strategy. Your team can now spin up dozens of variations of this promotion—buy a t-shirt, get a hat; buy a skincare set, get a cleanser—all from that single, powerful piece of logic you just deployed.
Activating and Testing Your Live Function
After you've filled out the fields and given your discount a clear name (like "BOGO Shoe Deal"), hit save. Just like that, the Shopify Functions discount is active and ready to go in your store.
But don't stop there. It's absolutely crucial to run an end-to-end test in a real checkout. Go to your development store's storefront and walk through the exact scenario you built the discount for.
- First, add "Product X" to the cart.
- Then, add "Product Y" to the cart.
- Go all the way to checkout and confirm that the discount applies correctly to Product Y.
Don't forget to test the "unhappy paths," too. What happens if only Product X is in the cart? Or only Product Y? The discount shouldn't apply in either case. This confirms your logic is solid and only rewards the specific customer behavior you intended. This final check is what gives you confidence that what worked perfectly on your local machine will perform just as flawlessly for your real customers.
Taking Your Functions From Test to Production
Moving beyond a simple "hello world" function and into something that can handle a high-traffic production environment is a big leap. It’s less about getting the logic to work and more about making sure it's fast, bulletproof, and scalable. This is where we dive into more complex scenarios and wrap our code in solid, professional development practices.
A production-ready Shopify Functions discount has to be ruthlessly efficient. Because Functions run directly in the checkout flow, every millisecond matters. Your code has to be lean and mean—no unnecessary loops or heavy calculations that could slow down the customer's experience.
Crafting More Complex Discount Logic
Once you get the hang of basic BOGO logic, the real fun begins when you start combining conditions. What if you wanted to create a discount that only triggers for customers with a "VIP" tag and a cart subtotal over $200? This kind of laser-focused promotion is a fantastic way to reward loyal customers and nudge up your average order value.
Another powerful strategy is setting up volume-based tiered discounts. Think about something like this:
- Buy 5-9 of an item, get 10% off.
- Buy 10-14, get 15% off.
- Buy 15 or more, and the discount jumps to 20%.
Building this out requires careful logic to count the eligible items in the cart and apply the right discount percentage. It's exactly this kind of dynamic offer that keeps customers engaged and can seriously boost your ecommerce customer retention strategies.
Why Performance Optimization Isn't Optional
The scale of Shopify is just massive. The platform has powered around $1 trillion in global online sales across 4.82 million websites, which collectively process an average of 199 million orders every single month. A slow function on a platform this big can impact millions of checkouts, which is why performance has to be at the top of your mind.
A game-changer for performance has been the WebAssembly (Wasm) API. It lets Functions execute almost instantly and only pulls the data your code actually needs, which dramatically cuts down on execution time and makes your discounts far more reliable.
To keep your functions snappy, focus on these key areas:
- Be Specific With Your Queries: In your
input.graphqlfile, ask for only what you need. Don't fetch the entire product object if you just need the ID and a few tags. - Rethink Nested Loops: Whenever you can, find ways to restructure your code to avoid looping through the same data more than once.
- Consider Rust for Heavy Lifting: While JavaScript is great for getting started, Rust often delivers superior performance, especially for functions that have to churn through large carts with tons of line items.
Must-Have Best Practices for Reliability
Just writing the code isn't enough. To ensure your custom discounts are high-quality and don't break in production, you need a solid process. A thorough code review checklist is a great starting point, but a few other practices are absolutely essential for production-grade functions.
Unit Testing Is Your Safety Net: Before you even think about deploying, you need to write automated tests. Create mock input objects that mimic all sorts of cart scenarios: the perfect qualifying cart, one that just misses the mark, an empty one, you name it. This is how you catch bugs early and gain confidence that your logic works as expected.
Get Comfortable with Logging: Shopify gives you application logs for your functions, and they are your best friend when something goes wrong. When an issue pops up in production, these logs are the first place you should look for clues. Make it a habit to check them to monitor performance and spot any runtime errors your tests didn't catch.
By adopting these advanced strategies, you can build a Shopify Functions discount that’s not just creative but also dependable and incredibly fast.
Common Questions About Shopify Discount Functions

As you start working with custom promotions, you're bound to run into a few questions. I've seen the same ones come up time and again. Getting clear answers upfront can save you a ton of headaches later, so let's walk through some of the most common queries I hear from developers about Shopify Functions for discounts.
The first concern is almost always about speed. A slow checkout is a conversion killer, after all.
Are Shopify Functions Fast Enough for Checkout?
Yes, absolutely. They are incredibly fast. Shopify built Functions to execute your logic within a high-performance WebAssembly (Wasm) environment, and they are engineered for the demands of a busy checkout.
We're talking execution times typically under 5 milliseconds. That’s fast enough that your customers will never notice a thing. To keep it that way, Shopify has some strict guardrails in place for CPU time and memory. If your code gets too bogged down or inefficient, it will simply fail instead of slowing down the checkout. This is a good reminder to always write clean, optimized code, especially if you're working on a store that handles large or complex carts.
How Do Merchants Configure My Function?
This is where Functions really shine for both developers and the marketing team. You don’t have to hard-code things like a 10% discount or specific product IDs into the function itself. Instead, you define what needs to be configurable in your shopify.function.extension.toml file.
Once you deploy it, these definitions create a user-friendly interface right in the Shopify Admin. When a merchant goes to create a discount using your function, they'll see product pickers, number fields, and other simple controls. They can set up a whole new campaign without ever asking you to touch a line of code.
Key Takeaway: The separation of the code logic from the merchant’s configuration is a massive win. You build a flexible discounting engine once, and your marketing team gets a powerful new tool they can use to create endless promotions.
Can Function-Based Discounts Be Stacked?
They sure can. This is a huge improvement over Shopify's older discounting limitations. When a merchant sets up a discount in the admin, they get granular control over how it combines with other offers.
For example, they can specify that your custom "Buy X, Get Y" product discount can be combined with a free shipping offer but not with another order-level discount. This gives them the power to run compelling, multi-layered campaigns without worrying about customers stacking deals in unintended ways. This level of control is essential when you're building out a more complex rewards system, which we cover in our guide to creating a Shopify loyalty program.